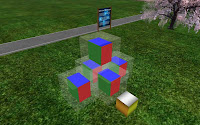
As we have seen, texturing glass boxes is not so easy; the hidden faces are not reachable. Because we cannot change mesh on-the-fly, GlassBox meshes use a special scripted item: The item is a box with six faces. As soon a texture or texture property on the prim faces changes, the installed script reflects the changes on accordant faces of linked glassbox meshes.
5.1. Repeater script
The script was published in SL wiki, also to keep this post shorter. Here you find it: Texture Repeater.
5.2. Script usage
We will now use the script with our uploaded glassbox mesh. Please create a new script in your inventory, name it somehow recognizable, e.g. ‘TextureRepeater’, than open it and replace the content by that in wiki (select only the script text.)
Now we rezz the glassbox mesh a few times, then we select their outer faces and then we make them white and transparent (either by setting the transparency to 75% or by using a transparent texture from library or any glass texture) so we can see the inner faces:
Now we create a box and put the repeater script into, then we give the faces of the cube nice textures and glow them as we like:
Now we edit one of meshes, select all others and the repeater prim – in any order – and link them together. Immediately the inner faces of the glassbox meshes start to reflect the texture settings on the repeater prim. Now we can further change textures and properties on the repeater prim – the changes appear soon on the inner faces of the glassbox meshes:
After we have done, we simply click the repeater prim, it shows a permission dialog, when we accept, the prim vanishes after unlinking itself from the linkset:
5.3. Mesh usage
In this step we extend the glassbox with the repeater prim to a single object while we use the meshbox as repeater prim, this also keeps the land imackt of the combination low even if just while configuration. We again rezz the glassbox mesh and then the meshbox nearby and install the repeater script into the meshbox:
Now we make the meshbox 2 cm larger than the glassbox at every axis. The plan: We hide the glassbox inside the meshbox so we can aim the meshbox faces properly. The glasbox is a cube with edge length of 1m, hence we make the meshbox a cube with edge length of 1.02.
Now we link the meshbox as child prim to the glassbox mesh, and then put them both at same position, so the glassbox is hidden inside the meshbox (imagine we cut the outer meshbox at the edge):
The idea is that by inspecting the object, we see the glassbox as root prim. When we edit the object name or description or put something into the prim content we change the glassbox, not the temporary attached meshbox. But when we drop textures on the object faces, we edit the faces of the meshbox so the repeater can send the changes to the inner faces of the glassbox.
Well, now we pick up a copy of this object in our inventory and play with the original now. Now we are going to use the mesh lattice in a way the meshes in GlassBox packages are meant to be used. First we give the meshbox faces textures we need and make them white and glow:
Once we are satisfied we click the lattice and touch so the repeater, the script inside the prim opens the known permission dialog. We accept the unlinking permission and the enclosing meshbox vanishes revealing so the enclosed glasbox:
The outer faces of the glasbox are still unchanged, but we can give them easily a transparent texture or make them just transparent. When we can see through we notice the inner box that has exactly the textures we adjusted on the vanished repeater box:
The meshbox is originally a C mesh – it is a cube while the glass layer is thicker in the depth direction. We can now flatten the mesh a bit to make the glass to be equal thick and turn the glassbox into a B mesh as explained in the last part):
5.4. GlassBox packages
As said, the way we used the lattice at the end of the previous section is the way to use the meshes in the JFS GlassBox packages. They are also combined from a glassbox and meshbox while the enclosing meshbox is a child prim of the lattice and has the Texture Repeater script installed. The only difference to our lattice is that for the packaged glass boxes, the enclosed glassbox meshes have already a glass textures assigned to the outer faces.
Here is a usage example of the glassbox q80bc10d80 and at same time very possibly how the new IFS product boxes will look:
Ok, when you read this blog right now you will wonder where to find those JFS GlasBox packages.
Well, they are not released yet. In fact, I am still in process of uploading the meshes: When you have to relog every time you need upload the next mesh, and each package has 17 or so meshes, that is not so simple. And a proper user manual is also not written yet. As soon I get ready with that all, you’ll find here links to the products on marketplace and this paragraph will then vanish.
Last part: Open glass box


Keine Kommentare:
Kommentar veröffentlichen